Adventure Nomad

Adventure Nomad

Friday, October 12, 2018

Lightweight Adventure Photography


_DSC0847
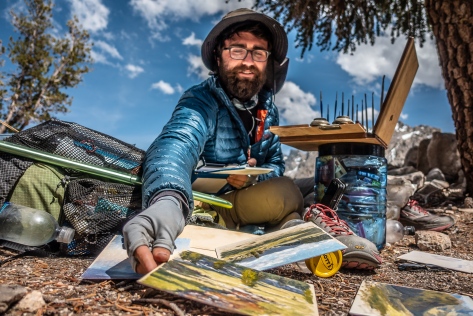
Unlike ‘Painter’, who carried 5 1/2 lbs of oils, brushes and canvases and a home-made easel on his thru-hike, a photographer’s tools are much simpler.  Sony RX100 V, 24mm equiv., f/1.8, 1/640 sec, ISO 125


Being able to bring back breathtaking images from a lightweight adventure trip, such as a thru-hike, are really part of the purpose of the trip for me.  But when the need to go ultra-lightweight conflict with the need to bring a camera, some decisions need to be made to keep the weight down, and the quality up.  Here’s the gear I used for my PCT thru-hike, my thoughts and process:
The Gear
For ultralight adventures, I have a preference for compact cameras with 1″ sensors, like those made by Canon, Panasonic and Sony.  I carried one of those to the summit of Everest, and are what I chose for my PCT thru-hike.  For me, they are the lightest weight, rugged enough, high quality option for a trip where minimum weight is a priority.

IMG_0992
The Approach to Mt. Whitney, handheld in low light.  Sony RX100 V, 24mm equiv., f/1.8, 1/60 sec, ISO 2500,

For my thru-hike, I used a Sony RX100 Mark IV and Mark V.  I damaged the monitor on my Mark IV in the desert, and my wife brought me a new Mark V to Kennedy Meadows, which I used (more carefully) til the end of the trip.  The Mark III, IV and V have similar focal length zoom rang: 24-70mm, so if you are trying to save some money, going down the evolution tree might suit you.  The 24-70mm zoom range is great for ‘people’ shots, but if I were to thru-hike the PCT again though, I would take the newest Sony RX100 Mark VI, which has a 24-200mm zoom range.  The additional telephoto range is useful for wildlife, but sacrifices a bit of aperture to do it, so it isn’t as good in low light, and will have a bit more image noise overall.  Also, it costs more than the other cameras.

IMG_1004
Cooling off in the Feather River.  Getting it all in with the Moment Superfish lens on my iPhone 7+

I also used my iPhone 7 plus with the Moment Superfish lens* to complement my Sony RX100 for a wider (fisheye) focal length perspective.  Why not use my iPhone for all my shots?  For me, the main deal breaker is that it doesn’t do so well in low light.  They are also cumbersome to operate, especially if you want manual settings.  My iPhone camera makes a good supplement to my compact camera for options, like a Fisheyeultra-wide or Macro lenses, but as a main camera, they are not quite there yet for me.
*Note: Use of Moment Lenses requires the Moment Case.

_DSC6008-2
Sony RX100 V on the Ultrapod, 10 second self-timer, 24mm, f/8 for depth of field and sunstar, 1/60 sec, ISO 125

I used a lightweight Pedco Ultrapod mini-tripod, which I left attached to the camera most of the time, mainly for selfies, like those you see in these shots and in the video below.  You have to be creative with setting it up: You can set it up on the ground, on a rock, strapped to your trekking pole, tree branch or post.  The whole setup fits in a ZPacks Shoulder Pouch attached to the shoulder strap of my backpack for quick access.  For selfies, I used the 10 second self-timer on the camera to allow me enough time to get into position, then fired off a burst of 3 or 5 shots.  There is also an option on the RX100 to use your smartphone as a remote, which I used once for a night shot.
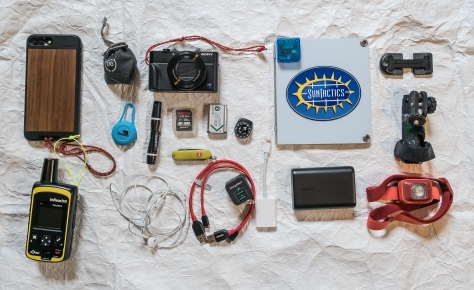
For my iPhone, I had a Joby Griptight One, which I bought together with the Micro Stand.  That could be a great option if you just wanted to use your phone camera for the thru-hike.  I took the stand off and just used the Griptight part to attach my phone to the Ultrapod.  I have the ProCamera App on my iPhone, to shoot RAW and for the extended self-timer.   I also carried a bluetooth remote shutter release for the iphone which I used only once.
In The Field
I tend to do most of my photography in the early morning.  The light is great, I feel fresh,  and I have the whole day ahead of me with no pressure to reach a campsite for the night.
Processed With Darkroom
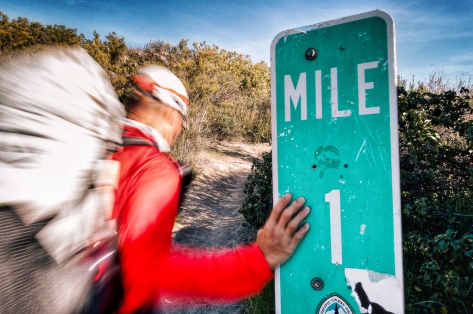
I wanted to create a shot of the One Mile marker with a blurred hiker walking past.  I tried out different shutter speeds, and this one worked out best. Sony RX100 IV, 24mm, 1/6 sec, f/11, ISO 200


I shoot mostly in Aperture Priority Mode.  I’ll choose something like f/1.8 for shallower depth of field or perhaps f/11 to create a sunstar if I’m shooting into the sun.  Occasionally,  I’ll shoot in Shutter Priority Mode to create some motion blur, as in the photo above.  Shooting in one of these semi-automatic modes frees me to make one creative decision, either the aperture or shutter speed, while letting the camera work out the the rest, like the ISO.  I will put the camera in Program Mode if my brain is fully occupied with other tasks or I need to focus, like when climbing Everest and low on oxygen.  I rarely shoot fully Manual, but will do it if it’s something the camera cannot handle, like night shots.
My Sony RX100 camera charges directly with a USB cable, so in the evening, it’s a simple matter to just plug in my camera into the power bank for charging.  I had a Suntactics S5 Solar Charger, and found it very useful in the desert and the Sierras, but not for NorCal, Oregon and Washington, where I replaced the solar charger with a Qualcomm quick charger for quick town stops.
Post-Process
When I have a zero (rest) day, I’ll transfer selected images from my camera to my phone for editing, posting to social media and for backup to the cloud.  I used to carry an Apple SD Card to Lightning Adapter, which would allow me to transfer the RAW images, but found that too much of a hassle, so I just used the built-in Sony App to wirelessly transfer a small JPG file from my camera to the phone.  These were good enough for Instagram, but not for viewing on a large monitor or for printing. However, If you shoot JPG, the camera will transfer a large JPG file to the phone.  I used Adobe Lightroom CC (paid) and Snapseed (free) on my phone to edit and post the images.  Not everyone likes my editing style, but if you are interested to replicate the look, here’s a quick and easy Snapseed editing tutorial on how I do it.   The images you see in the video linked below have all been reworked from the original RAW files for viewing on large monitors.


This seems a lot of effort, and it is, but I love sharing the experiences I’ve had with others, and having powerful images that make an impact are worth it me.
Wednesday, October 10, 2018

My Gear: Pacific Crest Trail 2018

This is a full list of the gear that I’ll be starting the trail with: https://lighterpack.com/e/cpvj52
Disclosure: I am extremely grateful for the generosity of #TheNorthFaceSG for their support these past 10 years.  Although I am no longer an athlete with The North Face Singapore, I am starting my through-hike with some gear that was provided to me at no cost.  
My thanks also to #Salomon USA and #OspreyPacks for supporting the 2018 P3 Program of the Pacific Crest Trail Association.  As my current gear wears out or is found unsuitable, I will probably be replacing them with gear from these sponsors.
Clothes
Snapseed 3
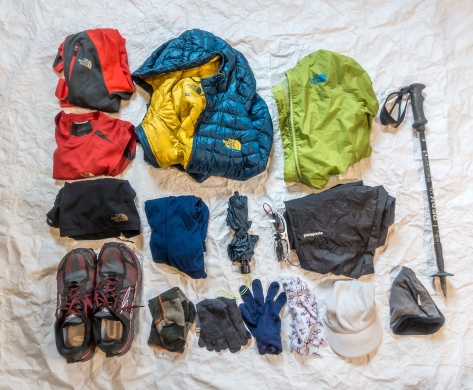
My choice of clothes are setup to be layered.  My shorts and tank top are my base layer.  If it gets chilly, I’ll throw on my long sleeve shirt.  If it’s windy, my wind and waterproofs go on over that.  My puffy and thermal leggings are really just for around camp, although if it’s exceptionally cold, I could walk in those too.
My long sleeve shirt is an older generation model of The North Face Impulse Active 1/4 zip.  Unzip the neck, pull up the sleeves, and it vents well.  The thumb holes are great for keeping the hands a little warmer.   It’s a pretty flexible piece of gear for cooler conditions.
My puffy is The North Face Thermoball Hoodie.  I like its synthetic fill, as it gives a little extra safety margin over down in wet conditions, but it’s a bit heavy at 350g.  If you were buying a puffy specifically for the drier conditions on the PCT, you might also want check out the Mountain Hardwear Ghost Whisperer, or one of the Montbell down filled jackets, for some weight savings.
I got to try the new Montbell Travel Umbrella in orange and dark blue (Thanks Saori and Chow!).  The orange lets a lot of orange light through, and it turned out to be quite distracting.  I also felt it was a bit hotter under the canopy than the dark blue one, so here’s a tip:  If you are buying this umbrella for shade as well as for rain, get it in dark blue.
I took about a month to adjust to the Altra Lone Peaks.  I actually put them aside after a few weeks because of issues I was having despite trying to get used to them with lower mileage.  I went back to my old shoes, but after a month in those, I developed other issues.  I then tried the Lone Peaks again, and this time, had no issues with them.  Go figure.  Anyway,  I’ve been training with them, and love them now.  The only downside is that the outsole does not grip well on wet surfaces.  The upcoming 4.0 version of the Lone Peak fixes this issue as it will be using Vibram MegaGrip outsoles which has good grip in the wet.
I like having 2 pairs of socks that are of slightly different thicknesses, so that I can accommodate for the swelling in my feet.
My cap is an old Salomon baseball cap.  I like it because the white top keeps my head cool in direct sun, and it’s black beneath the bill, which cuts the glare.  It’s also pretty light, and the whole thing is soft and crushable.
I only use a single trekking pole.  I lost the other while trekking in Nepal and running to get a photograph.  When I returned, the pole was gone.  I had the other one with me as it was dangling off my left hand.  Since then, I’ve not found a need to replace the missing pole.  A single pole works well for me as I often need one hand for the camera, and I also need one pole to set up my tent.
My glasses are Rudy Project Rydon with prescription inserts and the Photochromatic ImpactX 2 lens, which goes from very dark, to almost clear.  I’ve used this lens for ice-climbing in China and to mountain biking in Indonesia.  It’s very versatile.  I can also remove the lenses and just use the prescription insert with the frame.  Dorky, but it works.  In the interest of full disclosure, I got lenses, frames and prescription inserts from Rudy Project USA in exchange for one of my photos that was used in their catalogue.
My shorts are Speedo 16″ Leisure, and not the ones you see in the photo.  I was going to go with running shorts, when I chanced upon the Speedo’s.  They are very quick drying, have pockets and more durable than running shorts.  The downsides are that they are a bit heavier, and feel very coarse.
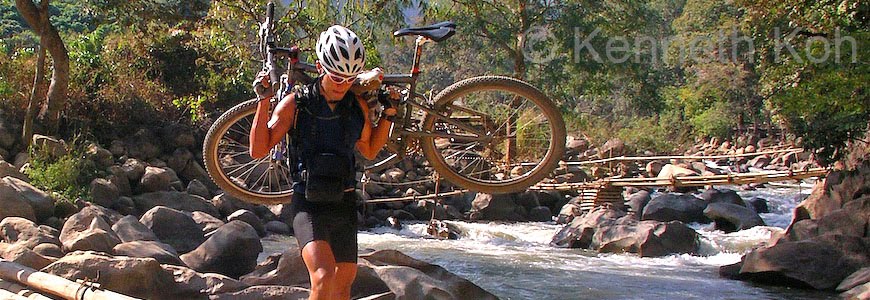
Suspension bridge at Karte
I left one trekking pole by the side of this bridge while running to get this shot.  When I returned, the pole was gone.  I’ve been using a single trekking pole since.
Not shown:  Dirty Girl Gaiters.  I’ve not had good luck with short gaiters in the past.  They tend to give me some pain around my lower calf where they rub.  I will pick these up before hitting the trail, and hope they will work.
My Big 3
IMG_7886 2
My backpack is the Hyperlite Mountaineering Gear Southwest 3400.  I’ve been training with this pack for the past 3 months and I’m quite happy with it.  I’ve added 2 Z-Packs shoulder pouches for quick access to my phone and camera.  My sleeping quilt is the Enlightened Equipment Revelation 20, and tent is the Z-Packs Hexamid Solo Plus, with 6 Sonic stakes.  My mattress is the small Thermarest Xlite.  It’s too short to for full body coverage, so my backpack, with food bag inside, goes under my legs, elevating my feet slightly to help with swelling and inflammation.  I’ve a piece of Tyvek for a groundsheet.
Electronics and Tools
Most of my electronics is centered around photography.  My iPhone with the Guthooks app is my primary navigation tool, and I also carry a Moment fisheye lens for the iPhone for certain shots.  My main camera is the Sony RX100iv, which is a slightly older model.  I carry it because the bigger, higher resolution sensor over the iPhone allows for better dynamic range, more detailed files with less noise, and shallower depth of field in certain conditions.  I anticipate having to shoot plenty of selfies, so I’m carrying remote triggers, and an Ultrapod that I can attach to my trekking pole and use that as a selfie-stick, or makeshift “tripod” by sticking the spike into softer ground.
I bought the older Inreach SE (I wish I’d bought the Explorer instead as backup for my iPhone GPS), and you can follow my progress herewhen I start the trail on April 8th.
What’s missing?  No watch, I’ll use my iPhone.
untitled_2718_1
Kitchen
I’m carrying a small 500ml Nalgene bottle with me.  It’s a bit heavy at 87g, but I can use it as my coffee mug in the morning and the wide mouth makes it easy to mix drinks in the day.  If I put a sock over it, it becomes a hot water bottle at night, or a make-shift ‘foam’ roller.
1.5 liters is the normal amount of water I carry.  In the desert, or where else I might need more, I’ll just buy extra bottles and fill those up as I go.  The Nalgene is my ‘clean’ bottle, where I mix filtered water with drinks.  The filter screws directly onto my Smart water bottle, and ‘dirty’ water goes into that, and I squeeze to filter as I need.
My stove is the BRS3000T.  It’s crazy light, but poorly made, with poor quality control…  I bought it for $12 off eBay, and when it arrived, it didn’t work.  I opened up the valve, cleaned it, fired it up again, and then it worked.  But really, for that price, I shouldn’t complain.  Test it before bringing it out though!
The Lexan spoon is lighter than my Ti Spork, and it’s nicer to use.
The pot is a tiny Toaks 650ml.  It’s the smallest one that will accept a small fuel canister inside.  I haven’t figured out how to store the pot in my pack, so the mesh sack is coming with me.
Not pictured:  Bic Mini Lighter, fuel canister
untitled_3118_1

Miscellaneous
The rest of my gear is just my hygeine stuff, first aid and repair kits.
untitled_3118_2
The full list of my gear is available in my Lighterpack.  I’ll try to update this list at the end of the trip.  Check back to see what changes I’ve made, what worked and what didn’t.
Thanks for stopping by!

Nutrition Supplements for My Pacific Crest Trail Thru-Hike

Like everyone else, I want to make sure I’m taking care of myself by getting proper nutrition while out on the trail.  Beyond just packing on the calories, it can be a challenge getting all the micronutrients we need to thrive from packaged food, and so I have decided to carry some nutritional supplements for my Through-Hike of the Pacific Crest Trail in 2018.
untitled_0511_1
Miriam Ueberall packing in some calories, before our Vacas Valley hike, Argentina
I prefer real, fresh, whole food to anything coming out of a package, but when I can’t get that, I look towards supplementing my diet.
Protecting Myself
First up on my list is Silver Sol – a broad spectrum anti-microbial that is proven effective against viruses, bacteria and fungus, like SARS, H1N1, Bubonic Plague, E. Coli and athletes foot.  It may also be effective in combating diseases like Norovirus and Lyme Disease.  This is different from the older ‘colloidal silver’ products, and has scientific proof it works.  When I first heard about it, I was highly sceptical.  I tried it out on an expedition to climb a remote mountain near the Tibetan border in China.  Everyone got sick (possibly from unclean food), except my wife and I, who were both taking Silver Sol.  Since then, this has been with me on every trip and expedition.  It’s been a great comfort to me when I can’t get immediate access to a doctor.
3
Something Green
Green drinks claim to be nutritional powerhouses.  With a diet low in fresh fruit and vegetables, they are a safe bet for most vitamin and mineral needs with a few exceptions – minerals like magnesium and calcium are usually insufficient, as is vitamin B12.  Most of these drinks are somewhat of an ‘acquired’ taste, so it’s important you find one that you can stomach.  My choice is Novaforme’s CytoGreens.  It has a good amount of spirulina, a little protein, no probiotics, but it has enzymes and pre-biotics.  If you are vegan, or on a limited budget, I’d just get a green drink and skip the rest.
Something from the Land
Desiccated liver tablets have been a mainstay of the bodybuilding world for decades.  They are a protein source with a complete amino acid profile, full spectrum of B vitamins (including B12), bioavailable heme iron for blood building (red blood cells are apparently destroyed from all the foot pounding we do as hikers), and some mysterious ‘anti-fatigue factor’, which is supposed to improve endurance in a study done on drowning rats (Source).
Something from the Sea
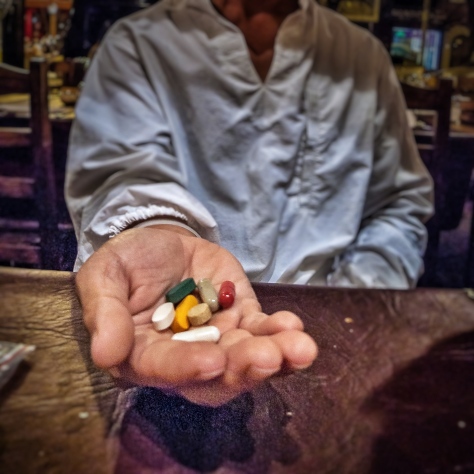
Fish oil is rich in Omega 3 essential fatty acids and has many uses.  It’s anti-inflammatory, and protective of the heart, brain, eyes, skin and many other organs. When I was climbing Everest, I had a small bag of pills with me, but the only ones I could swallow were the fish oil and liver tablets.  Maybe my body knew which ones were actually good for me.  I made the summit, but at the end of the trip, I had a little bag of pills, minus all the fish oil and liver ones, and lots of sachets of protein powder, which I just could not stomach.
Snapseed 3
Climbing Aconcagua, Argentina, with my little bag of pills.  These are just the ones I took with dinner! I rarely take any pills now, and prefer whole food type supplements.
That’s what I would take to just about any trip around the world.  For the Pacific Crest Trail Through-Hike, I’m taking along some extra items, like evaporated coconut water for minerals and electrolytes, chia seeds (another nutrition powerhouse), and ghee/MCT oil for fat/energy.  I made a list at iHerb for easy reordering along the trail.

Tuesday, October 9, 2018

Training to Thru Hike the Pacific Crest Trail: Part 3

I’m pretty happy with the progress of my training.  I started cautiously by hiking just 1 mile with no load, nursing some injuries and progressed to walking 22 miles (35 km) with a 22 lb (10kg ) backpack.  I feel strong, and I am optimistic as I have been hiking injury free for the last couple of months.  I have lost 5.5 lbs (2.5 kg) of muscle mass during the last phase of training, and I am hoping to put some of that back as I enter the end phase of my training which takes place in the final month before my through-hike – Peaking and Tapering.
IMG_7706
“Don’t Hold Me Back!” Juliette, a Google employee, tries to pull me off my feet at The North Face Outdoor Training conducted for Google Asia.  Photo courtesy of The North Face Singapore.
Peaking (1 week)
The idea behind peaking is the culmination of a gradual buildup of volume (distance) and intensity (load), and not a sudden, panicked rush to train in the final weeks leading up to a through-hike.  That would be foolish and could lead to an overuse injury down the line.  If your training has not been sufficient, the safer option is to just continue to gradually build up til the last week, and maybe back off a bit, so you don’t arrive at the start exhausted.
For me though, I like to use my peak training like a test run of the first week of the through-hike.  Ideally, peaking would take place about a month before my start date, and I would use the opportunity to go on a 3 to 7 day backpacking trip to test out all my gear.  Unfortunately, I live in a place where this is not possible, so I will do what I can and link up 3 consecutive training days, hiking about 15 miles each day, carrying 22 lbs (the average weight of my pack for the first week).  Why 15 miles?  Although my longest training hike has been 22 miles, at longer distances, I felt I was pushing it and needed to rest, or do some other activity, the following day to avoid overuse injuries.  15 miles is a distance that I am comfortable hiking for, at least, a few days continuously.
IMG_7806
Thunderstorms covering much of Singapore!
Things don’t always go according to plan, and on the the 2nd of the 3 continuous days.  I got about 5 miles in, when thunderstorms rolled in, so for safety, I bailed.  I got the 15 miler the day before, and I continued with the 15 miler the following day.  But I want to adapt my training the following week by carrying a heavier load (up to 25 lbs) for shorter distances (up to 15 miles) for a total of 50 miles over 5 continuous days.
IMG_7809
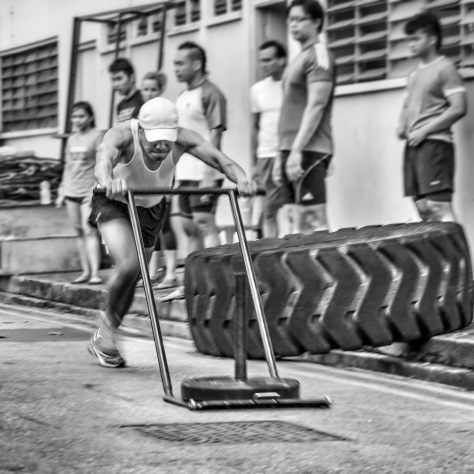
High Intensity Crossfit Prowlers. Photo courtesy of Laura Liong.
Tapering (3 weeks)
Ideally, at the end of my peak training period, I would taper by gradually reducing my training volume and intensity, so that I arrive at Campo on my start date well rested, and ready to go.  Generally this means stopping strength training at the end of my peak training period, but maintaining high-intensity training for the first 2 weeks of my taper while reducing the total volume, and for the final week of taper, I would eliminate all high-intensity training and reduce my hiking volume even further.  I had to adapt my taper to just two weeks, due to the weather, so we will see how that goes.
It may not absolutely necessary to do any strength or high-intensity training to do a through hike.  I just like to do it because, after putting in the required hiking miles, I feel it gives me an extra margin of safety, and I like to feel strong and in the best shape I can be for anything unknown that may crop up.
I personally feel that many of the injuries that take people off the trail are overuse injuries that may have been prevented by proper and adequate training.  Keep in mind that while this approach has worked for me in the past, it might not work for everyone. However, I hope it gives you some ideas on how to approach your own training and preparation.
Best of luck to anyone starting a through-hike!  I wish you guys a fantastic journey, and hope these training posts have helped.
“Every battle is won before it is even fought” – Sun Tzu, The Art of War

Monday, October 8, 2018

Training to Thru Hike the Pacific Crest Trail: Part 2

The first part of the training phase took longer than I expected.  It surprised me how weak I’ve become since climbing Everest.  My muscles and connective tissue were not conditioned and I needed to give them time to adapt.  I had to heed the warning signs of joint pain, which meant I had to back off, and so it was not until mid-January that I was  able to fully load up my pack and train for a few days in a row without pain or fear of injury, and thus, to start the Building phase proper.
IMG_5877
Hiking the Vacas Valley, Argentina.  Nope, nothing to do with the PCT.  Just a nice hiking photo ðŸ™‚
Building (3 Months)
Where the goal of Pre-Training was injury prevention, the goal of Building is to acquire the fitness and strength needed to hike the trail.  However, injury prevention is always the main goal of this training, and anytime I feel pain, I’ll back off and have it looked at.  It might just need a day’s rest, or it might need more attention, but training through pain is just plain dumb.  The time spent in each phase is just a guideline.  I took as much time as needed.
Types of Training
There are basically 2 types of training:  Sport Specific and Non-Sport Specific.
Sport Specific Training for hiking just means going out hiking with your loaded pack, preferably with the shoes and backpack you intend to use, and where possible, hiking similar terrain and conditions to what you will find on the PCT.  I aim to spend most of my time (about 80%) on Sport Specific Training.  Most people are looking for shortcuts.  There aren’t any.  The bulk of my training for the PCT is just to go out with my pack and walk.  And walk.  And walk…
KEN_1610_1
Back when I had legs!  Pre-Everest training, I think.
Non-Sport Specific Training is basically everything else.  This includes lifting weights, running, yoga, Crossfit, swimming, yoga, etc.  I aim to reduce my time spent on Non-Specific Training to 20%.  Non-Sport Specific Training can be valuable, but we only have limited time and energy to spend, and so have to decide where best to spend it.  I spend some time on this type of training to prepare for the unknown and the unknowable situations: like being able to swim across a swollen river, having to run to meet a deadline, or having the strength to push a trail angel’s car out of the mud.
Principles
Cumulative Fatigue (Micro Cycle)
One of the key principles is to train for cumulative fatigue.  I find I can train for 3 consecutive days before I need a day off.  The idea is that the body does not get complete recovery after each day.  This week, I rock-climbed for 3 1/2 hours on Monday, hiked 12.6 mils (20.3km) with a 22lb (10kg) pack on Tuesday, and hiked 10.5 miles (16.75km) with a 22lb (10kg) pack on Wednesday.  I was pretty beat, and took a rest day on Thursday.  That would be a Micro Cycle for me.  At the end of every fourth Micro Cycle, I will take an extra day or two off, for more complete recovery.
Stacking
Stacking is a term I used while training for Everest.  For me, it loosely means the arrangement of one type of training over another, either in the same day, or during consecutive days.  I train the activity with the highest neuromuscular requirements first, and the the one with the lowest, last.  That means that I maximise my performance as I fatigue.  For example, I might have a soccer game on Friday evening, which requires high neuromuscular involvement, and hike some hills with a loaded backpack on Saturday, and then just go on a long hike on Sunday.  On a work day, you could go for a run in the morning before work, lift some weights during lunch, and hike back home after work with your backpack.
Training Goals
In general, I’ll set a goal if there is a target to reach, but in the case of thru-hiking, it is so long that the training really continues into the hike.  I’m going to try to end my Build phase with 3 hikes of 15 miles (25km) carrying 22 lbs (10kgs) over 3 consecutive days.  That should be a comfortable distance for the first few days of hiking, and will enable me to reach Hauser Creek at the end of day one without overextending myself.
In general, I’m pretty happy with the way my training has gone.  I’ve come a long way from when I started in September walking just one mile and carrying nothing.  My foot pain has gone, my knee pain has not reappeared, but I know it’s lurking, and I have to be careful.  Some ankle pain showed up recently, and I’m not sure if it’s the shoe or the insole.  I changed both and for the last hike, had no issues.
IMG_6951
The Southern Ridges Trail in Singapore, with a couple of nuts who thought this was going to be fun!  14.5 miles (23.25km) with a 20lb (9kg) Pack
Some Exercise Suggestions
Building on the Squats and Deadlifts that I suggested in the Pre-Training Phase, I added some locomotion specific exercises: Single Leg Squats and Pistols, Single Leg Deadlifts, and Walking Lunges.  When you are ready, one great way to end a workout with some high intensity is JC Leg Cranks (Watch her form!  Thighs parallel to ground on squats and squat jumps, back leg touching or near the ground on lunges).
Happy Training!